Lab 2
Step 1: Diagram the network
· Which kind of cable is required for a direct Ethernet connection between the two PCs iscrossover cable
Step 2: Document the PCs
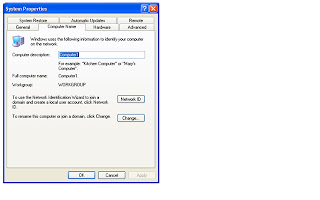
PC1 Name: | Komputer 1 |
PC2 Name: | Komputer 2 |
· important that each PC on a network have a unique name because its making easier for users to connect to shared resources and that help to identify other device and its locations
Step 3: Connect the Ethernet cable
· Use the Ethernet crossover cable provided by the instructor. Plug one end of the cable into the Ethernet NIC of PC1.
· Plug the other end of the cable into the Ethernet NIC of PC2. As you insert the cable you shouldhear a click which indicates that the cable connector is properly inserted into the port.
Step 4: Verify physical connectivity
Step 5: Configure IP settings
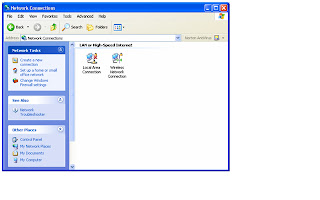
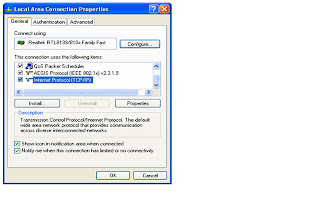
1. Configure the logical addresses for the two PCs so that they are able to communicate using TCP/IP.On one of the PCs, go to the Control Panel, double click the Network Connections icon, and then right click the connected Local Area Connection icon. Choose Properties from the pull-down menu.
2. Using the scroll bar in the Local Area Connection Properties window, scroll down to highlight Internet Protocol (TCP/IP). Click the Properties button.
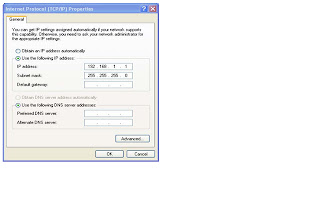
3. Select the Use the following IP address radio button and enter the following information:
IP Address | 192.168.1.1 |
Subnet Mask | 255.255.255.0 |
4. Ok.
Step 6: Verify IP connectivity between the two PCs
.
1. On PC1, on the Windows XP desktop, click Start. From the Start menu, select Control Panel, and double-click Network Connections.
2. Right-click the Local Area Connection icon and select Properties. Click the Advanced tab. Locate and click the Settings button.
3. Make a note of whether the firewall settings are ENABLED (ON) for the Ethernet port or DISABLED (OFF) for the Ethernet port.
ü Firewall are enabled (ON)
4. If the firewall settings are enabled, click the Off (not recommended) radio button to disable the firewall. The setting will be re-enabled in a later step. Click OK in this dialog box and the following to apply this setting.
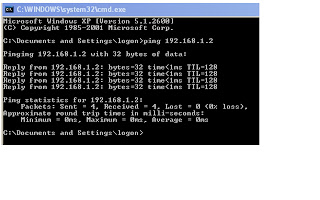
5. Now that the two PCs are physically connected and configured correctly with IP addresses, we need to make sure they communicate with each other. The ping command is a simple way to accomplish this task. The ping command is included with the Windows XP operating system.
6. On PC1, go to Start, then Run. Type cmd, and then click OK. A Windows command prompt window will appear as shown in the figure below.
7. At the > prompt, type ping 192.168.1.2 and press Enter. A successful ping will verify the IP connectivity. It should produce results similar to those shown in here.
Step 7: Verify connectivity using My Network Places
1. Do you see an icon for the other PC in your peer-to-peer network?
· Yes I do.
2. What is the name of the other PC?
· Its name is Komputer 2
3. Is it the same name you recorded in Step 2?

